
Hello!
If you're new here, here's a link to my first blog post, which is a detailed analysis and breakdown of Two-Face's main costume from Batman Forever.
You can find that post here: https://www.blogger.com/blog/post/edit/8676475066129387926/579863588751409663?hl=en
This post is going to be the "recipe" I used to arrive at my own recreation of the Forever Two-Face suit. It is a saga, let me tell you. But, hopefully, it will help anyone else embarking on replicating this particular costume! It's kind of the wild west out there when it comes to recreating any Batman Rogue that isn't Heath Ledger's Joker.
With MOST of these characters, you can at least find auction listings of screen-used costumes, pull reference photos, and work from there, but I have never seen this suit at auction. I've seen the Nygmatech paint-splattered tuxedo a few times.
I've seen elements from the circus ringleader outfit (the top hat and detonator).
I've even seen production-made suits that didn't wind up in the film (the red & black suit used with Rick Baker's original test make-up)!
I even saw this one come up. Production made, but never seen in the
film. It does, however, feature many details in common with the
split-lair hideout fit he is wearing when the Riddler makes a surprise
entrance.
But the "main" Fuchsia split-suit? Zilch. I think Warners may own all the original, screen-used copies or something. If I'm wrong, please let me know!
Keeping all that in mind, I worked from my own research. I wish I could have just added all these things into one cart and had it ordered in one go--if only! It took a lot of work, a fair amount of money and some help from friends. First of all, I want to shout out to the Delena McCurdy, aka the Crimson Thistle, who sewed the suit together for me. Delena's work is incredible. I met her through mutual friends at my city's local con last year and we went from there. She primarily works on Ren Faire era stuff, so this was definitely out of her wheel-house, being about as 90s as it gets! Here's her page: https://www.facebook.com/TheCrimsonThistle
I want to thank one of my oldest friends, Kat Higdon, who helped me with the wig and with the mask.
I also want to thank Lisa Abell, aka the White Witch, who customized my left shoe.
Thanks also to Butch Smith, who gave me a lot of guidance on the 3D-printing side of things--specifically with the gun and the glove.
Last, but not least, I also want to thank my partner, Ryan, for being my Batman and for his patience in putting up with my fussiness through all of this. Cosplay takes a village, people!
With all that being said, let's get into it!
I first began researching the suit around September 2023, after wrapping up my Joker '89 build. (If there's sufficient interest, I may make a post about the Joker process, too!). Fittingly enough, this is only my second ever build!
Firstly, I want to link to ArtisticAsylum on Etsy: https://www.etsy.com/listing/1208221713/two-face
-Let me be clear: I did not purchase my suit or its materials from this seller, but their post on Etsy was an invaluable help because they included in their listing the following three vectors:
-They are the patterns for, in order, the suit/trouser for the Two-Face side; the dress shirt for the Two-Face side; and the lapel for the Two-Face side. They were great! This is where I started, but, as you'll see, after having sample fabric printed, I made some modifications to the color of the suit pattern AND the shirt pattern, to get them more film-accurate. The lapel was/is PERFECT, and is nearly 1:1 with the film. Without that listing, I could absolutely have not proceeded. So BIG shout-out to them!
Because I am so very extra and obsessive, I wanted to make my suit out of the same materials that were used on the original film costume. I divided the suit's components up into sections, and in the same order as my original analysis post. (Split-suit; shirt; tie; suspenders; glove; Yin-Yang cuff-links; wristwatches; lapel pin; shoes; coin; gun; and, finally, face/wig.
THE SPLIT-SUIT -
The real bitch of doing Two-Face is how deceptive the challenge seems. You think, or at least I did, "Oh, since I'm only really having to worry about the crazy/wild side, I'm really only having to do half the work!" Seems easy enough. But then, you start to realize, holy crap, that means I have to buy two of EVERY article of clothing, and it. Adds. Up. FAST. So, fair warning, this version of Two-Face, especially, with all its intricate details was NOT a cheap, or easy, or quick suit to replicate. Faint of heart, you've been warned. Without further ado:
I began with a charcoal Terzo Uomo wool-blend suit. It had a single-button blazer, a wide lapel, three-buttons on the wrist. It was checking most of the boxes I needed and, bonus, it wasn't too terribly expensive! I found it on eBay. I wish I could give you a specific link, but that was a one-time purchase for me. (If you're really looking for a deal, try checking your local Goodwill or Habitat for Humanity. They usually have suit jackets around. If you're not as particular about the cut, lapel, buttons, etc).
So, the Harvey side of the split-suit was taken care of. Now came the hard part: the magenta tiger-stripe.
I printed some test fabric using the website Spoonflower using the vector from Etsy above and this is what it looked like:
-The magenta suit material in the film is a velvet shimmer fabric. I used Spoonflower's "Performance Velvet" in these photos. I had swatches done in both the "Performance Velvet" and the "Celosia Velvet," options, but neither of them were satisfactory to me.
The shirt sample I had initially printed on cotton (this was when I had the notion of doing this "cheaply," haha). I'll go into it further down in the shirts section!
The lapel was poly-satin and pretty much dead-on. Like, dang. Just plug that vector above into Spoonflower and opt for poly-satin.
The velvet swatches, though, printed almost solid red. That was disappointing, so I tweaked the design. I got 5 test swatches on Spoonflower. And maybe I'm dumb, but I couldn't figure out how to enlarge my print size using Spoonflower at the time (I think their interface has improved since), so I switched over to using the website Contrado.
Contrado had more options when it came to velvet, their velvet fabrics were cheaper PLUS I could easily enlarge the design. I had samples printed on ALL the options offered at the time; plush velvet (too fuzzy!), crushed velour (too stretchy!), marbled velvet (too firm!), velvet-fever poly-satin (too thin!), and, finally, velvet shimmer (winner, winner!). I continued to experiment with color trying to replicate the film... I wanted that damned gradient! This was, by FAR, the biggest obstacle of the whole costume. I fought that color for MONTHS. It became my white whale. Well, my Fuchsia tiger-striped whale... Every swatch had a problem... Too purple, too red, too pink... In the end, I wound up getting 19 swatches on Contrado! And they added UP. Here are just a few images of the various swatches I had done:
I got stuck on this for a WHILE, you guys.
At one point, I began to become impatient. I was meeting up with my seamstress in January and rushed an order to try and get the fabric to her in time, and I did so without double-checking the print size...
So, that was fun. Just a total waste of time and money and fabric (if anybody is interested in it, let me know! It would be nice to get it to someone who could use it and perhaps even recoup some of the loss I took on it!)
Finally, I settled on this:
-Ironically, this was the SECOND version of the design I had tweaked. It may not look very great, and I had initially passed on it myself, but the more I looked at the sample I had printed using it, the more I realized it was the winner. I could have saved myself a LOT of time and test swatches if I hadn't been so fussy and perfectionistic, because this design on Contrado's velvet shimmer option is very gorgeous. I had dismissed it at first because it looked too red. The following pictures are both using the design above. (I had a second swatch done to confirm it was the design I had used originally, because, after nearly 20 others, I was beginning to lose track!).
This was under my workplace lighting:
These are the EXACT same swatches under sunlight in my car:
Ding! Ding! Ding! A reddish-magenta that shifts color under different lighting conditions?! This was the one.
So, I had enough fabric printed to do the suit. The width of the design square I wound up using was 12.47 inches. Fair warning: Contrado defaults to a weirdly sized "yard." You will need to adjust the size of the fabric, and it costs extra. But don't make the same mistake I did and have to order more later! I wound up getting a 54x54 sized bolt, which worked for me.
THE SHIRTS -
The shirt fabric had a green tinge when I tried using ArtisticAsylum's vector. So I warmed it up a little and got it to go from this:
To this:

-It may not seem like a drastic or dramatic change on a screen, but on printed fabric, it made a world of difference. There are some shots in the film where the fabric DOES have that neon-highlighter tinge to it, but in most images I've seen over the years, it had a more solid, warm yellow, and I found that preferable.
For the "Harvey" half of the shirt I used this:
"J.VER Men's French Cuff Dress Shirts Regular Fit Long Sleeve Spread Collar Metal Cufflink"
The collar is not quite as big, but, eh. It has the striping and a French-cuff. Compromise.
The leopard print I had printed using Contrado. There was an option to have it printed onto a short-sleeve dress shirt.
So
that's what I did! I figured the right-half could be used to create a
sleeve for the left arm and for the cuff. That seemed easier than having
to sew it entirely from scratch. I opted for silk, which was way more
expensive, but I felt would hold up better than polyester. We'll see if
I'm right. The print size was 5x5 for the design. Here's the result!
I was pretty pleased! It looked pretty "spot on" to me. Okay, I'll see myself out...
THE TIES -
For the Harvey side's tie, I found a burgundy tie with white dots on Etsy. It was not expensive at all. Plug the following picture into Google lens and you can probably find something similar.

The leopard one I had done using Contrado again. You can custom print a tie just like you can a collared-shirt.
The left side's tie was...trickier than I imagined. You'd think "leopard print" would be easy
enough to source, but the tie in the film had an orange tint and a
brushed look to it. I looked and looked for an exact match, but couldn't
find anything 1:1. I wound up using this pattern:
I...honestly can't even remember WHERE I came upon it. Here's how it looked once it was printed:
My print pattern width was 38.75 inch, which I now realize was a little big. Oh, well. You learn.
THE SUSPENDERS -
For the Harvey side, I just type "Crimson suspenders" into Amazon and found the cheapest ones with button clasps. Trust me on that, you don't want the clamp/clip kind. They snap. (I found that out the hard way at a con when I was in my Nicholson Joker costume!)
"Moulen Men's Y-Back 1.4 Inches Wide Button End Elastic Adjustable Suspenders"
Link: https://www.amazon.com/Y-Back-Inches-Elastic-Adjustable-Suspenders/dp/B07SMTVV88/ref=sr_1_32?dib=eyJ2IjoiMSJ9.PJUT_-DmFBVsqavHVLr821R0efexbpHBMgtAjhcnyG3RnKjQiEVoM3Fs8Mu-gFBiCmQRapMkbQrfVZ2Mc-ZcfwSI1wAqBjyKSw6I0Ety41glRwbvMRVULrPBepNSS4dvQTG9X9WFvlEP-WLWZDdwSP3hBn_EQC6FsuuyBRjTwoo1q5dtLDIrrjkhiyVo9_CqKpig2Rzbky-ga_hxmjy-hpWjluIQRTUyaoTTKkR3mB0_ADmeF-uM8ncyZD3Vs0-peoBl1qFR-8FrNBitaXQd6LK4C_y7Va41zD39Lq98QM4.CHKJ1wekaNSlte2C0ik_YfOH4aj2zw27sB77dBT2B0s&dib_tag=se&keywords=crimson+suspenders+men%27s&qid=1727477915&sr=8-32
-For the Two-Face side, I looked at many skull suspenders. At one point, when I was feeling particularly extra, I tried to print the skull pattern from an image I had of the cummerbund, but I realized that was perhaps a little too crazy for something most people weren't even going to see. But that's me in a nutshell.
I found the following pair on eBay and went with them:
THE LEFT FINGER-LESS BIKER GLOVE -
This was actually one of the easiest parts of the costume! This glove, while not identical, is SO damned close.
"Long Keeper Fingerless Genuine Leather Men Gloves Half Finger Driving Cycling Bike Motorcycle Outdoor Sport Gloves"
Butch, whom I mentioned earlier, digitally sculpted the "metal" bars for me and 3D-printed them, lacquered them and airbrushed them with Alclad Chrome.
After that, he recommended Barge contact cement and I just worked from the reference gluing them to the glove. A little time, a steady hand and some Goo-Gone to wipe away excess glue strings later...
I was VERY happy with how this turned out!
THE YIN-YANG CUFF-LINKS -
I found the cuff-links on eBay. They were cheap and came from China, but were pretty much perfect.
THE WRIST-WATCHES -
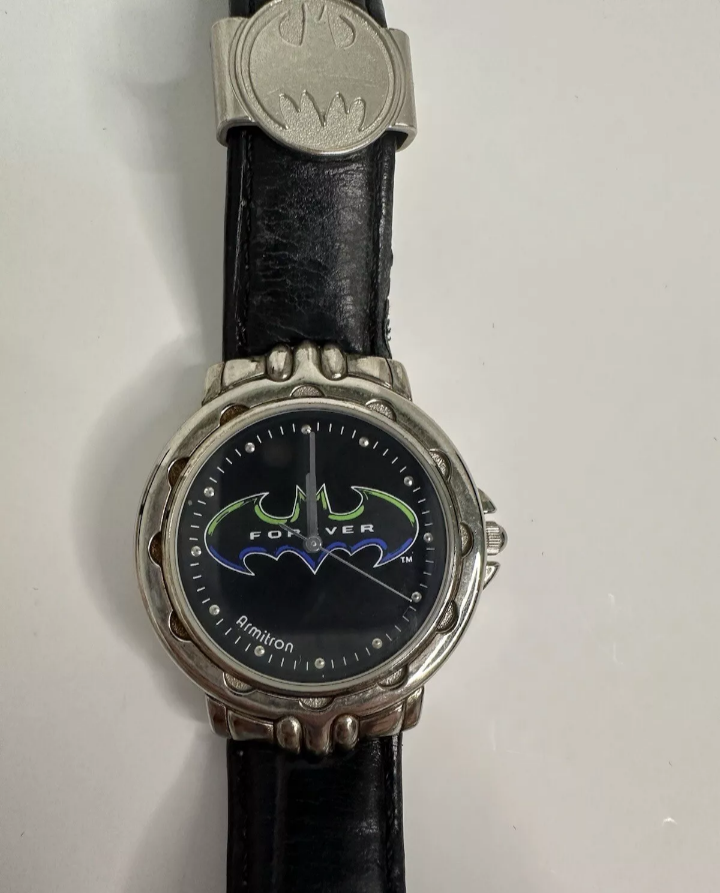
At one point, being the lunatic I am, I tried to source what actual watch Two-Face wore on his Harvey side. Then, after a certain point, I realized, "that's nuts, man, just settle for something with a black strap and a silver dial." Then I thought, "why not be clever as well and wear a Batman watch?" That's when I found this vintage Armitron watch made for Batman Forever! That became my Harvey watch.
I found this red & black Yin-Yang watch on eBay!
I asked the seller if they could put a brass wrist-band on it (to make it more film-accurate) for an additional charge, and they did! Shout out to my co-worker Hailey's mom, Angie, who works in a jewelry store and re-sized it for my (tiny, dainty) wrist!
LAPEL PIN -
I used the following skull & crossbones brooch pin. I found it on Amazon!
"U7
Gothic Skull Brooches Pin for Halloween Men Women Stainless Steel
Silver Black Viking Rune/Wolf Head/Deer/Spider Animal Gothic Brooch
Scarf Dress Lapel Pins"
I was happy with it! Your mileage may vary.
THE SHOES -
I started out with Stacy Adams Oxfords. I bought a standard black pair and was perfectly satisfied with them for the Harvey side of my costume. I bought an "alligator" skin pair for the left side, with the idea of customizing it, adding the boot-tip, etc.
I quickly realized that the shoe's toe was too rounded and wide to go forward with that. Bummer. I had to return that pair.
I then found these on eBay:
I was skeptical at first. (They came from China--what would the quality be, they don't have laces--etc.), but, they actually arrived and looked...good! Not quite as perfect as the picture, but, hey.
Fair warning, if you go this route: they had a VERY strong, chemical smell to them. I had to let them air our for a while to get rid of it. I washed them, stuck them outside, put them in a bag with dryer sheets. After a while, they did lose that smell. But, still. Thought I'd mention it. If you're at all sensitive to fragrances, these might not be a great fit.
SKULL BOOT-TIP -
The skull boot-tip I bought from a cowboy boot supply site called Mr Boots.
Link:
https://www.mrboots.com/ALM-302TCN-SKULL-Cowboy-Boot-Toe-Caps-Nickel-with-Raised-Skull
SHOE STRAPS -
For the elastic straps, I used these from Amazon:
Boncas Improved Adjustable Elastic Boot Clips Boot Straps Pant Clips Stirrups Leg Straps Keeping Your Pants Tucked
Link: https://a.co/d/2PTwzwO
SKULL BUCKLES -
The skull "buckles" were pins found on eBay.
HEEL STUDS -
Found on Amazon.
SBYURE
500 Pieces 10mm Four-Jaw Square Rivets Silver Metal Pyramid Studs
Handicraft DIY Punk Spikes Spots Studs Accessories with 2 Pack Straight
Tipped Scratch Awl Craft Tool
Link: https://a.co/d/0YrRWJTHere's what everything looked like together:
Lisa, who I mentioned earlier, cobbled this from all those separate elements:

PURPLE SOCK -
The purple sock I found on Amazon as well.
ZAKIRA Finest Combed Cotton Dress Socks in Plain Colours for Men, Women:
Link:
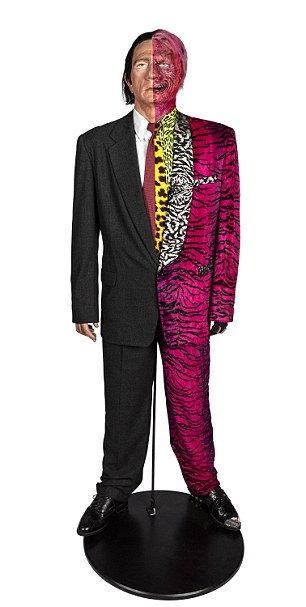
https://a.co/d/j7FoqAzHere's what it all looked like together for the first time once it was finished! (I have big feet, by the way. I think Tommy Lee Jones wore a size 10. I wear an 11 1/2).
Here they are next to the fabric sample I had settled on:
THE COIN -
I found the coin on eBay. There are a handful of sellers on there who make the Forever coin, though you will have the wade through endless Dark Knight coin replicas. If you're in a pinch, you can always buy a vintage Kenner Two-Face figure from '95! I wish there were a specific way to link you to someone who consistently makes the coin replica, but, they seem to be sporadically available. My guess is: there just isn't as much demand for this coin, sadly. It's a much cooler coin! (Maybe this cosplay guide will rejuvenate interest in Forever Two-Face!)
TWO-FACE'S GUN -
I bought a 3D file for the gun. It was a pretty spot-on recreation of the actual gun used. I printed the gun in resin.
Link:
https://3dmodels.org/3d-models/benelli-mp-95e-22lr/#360viewHere's how it looked after printing and sanding it smooth. Below, you can see it with the glove and the watch. This was before I had modified the glove, obviously.
Butch, also sculpted a small "under barrel" piece that the original 3D model was missing to make it more accurate. You can see it in the pictures below.
I used the following three products on the gun:
Tamiya primer
Krylon lacquer
Alclad Chrome 2.
(Ignore the Rust-Oleum bottle in the pic below!)
First, I sanded the shit out of the print and then hit it with a few coats of the Tamiya spray.
Next, I glossed it up with the Krylon laquer.
Once that was dry, I taped off the handle and used an airbrush and the Alclad chrome on it. Be SURE to wear a mask when using any of these products and do so outdoors (during low humidity), or in a very well-ventilated space.
AND LAST, BUT NOT LEAST: TIME TO FACE THE FACE -
Of course, you can't have Two-Face without two faces. Recreating the face was a looming and daunting prospect. For all the work that when into all the other areas, the main draw couldn't be disappointing. As far as I'm aware, no makers online offer replicas of the complete prosthesis. ArtisticAsylum offers one on his Etsy, but it's only certain segments.
The original film's design was achieved by blending separate elements together. But I am... Not a make-up expert. I didn't feel confident enough in my ability to recreate that. And I didn't want to simply paint my face, as I've seen many cosplayers do for this character. Truthfully, I was afraid that the paint would rub off and onto the (expensive-ass) fabric I was printing up. So, I began to toy with the idea of using an old mask to achieve the illusion.
I began with a vintage Batman Forever rubber Two-Face Halloween mask. Specifically this one:
-I think it was produced by Rubies back in 1995. Correct me if I'm wrong. When I got it in hand, I was surprised that the material was a THICK rubber and not nearly as flexible as Halloween masks usually are. I had concerns about it adhering to my face, but, I thought, "we'll play around with it and see."
Obviously, it needed a lot of work. So I trimmed it and set to work re-painting it.
I got it a little closer to the movie and here's how it began to look.
...It was off to a promising start! I thought I had a good idea going!
That was when I stumbled upon one of these beauties:
This is a much rarer and much more detailed "deluxe" Halloween mask
produced by Collegeville for, I think, Warner Bros. stores in 1995.
%20RPF%20Costume%20and%20Prop%20Maker%20Community.png)
Here's a vintage photo of one on display in a Warner Bros. store in the 90s! I guess Warner Bros. stores also sold a replica of the costume? I was a young'un in 1995, and lived in a pretty rural community. We obviously did not have Warner Bros. stores around me, so I have no idea if that's the case or if this was just a display. But if anyone reading this has more information about it, please let me know! If you BOUGHT one (or even better, OWN ONE), I'd love to know more about it! (And maybe even buy it off you!)
But anyway! Back to the Collegeville mask...
This
sculpt blew me away. It must have been pulled from a mold of Rick
Baker's designs, because wow, it looked great. And what's more, it is
made of a MUCH more elastic type of rubber, much thinner. You can't
imagine my excitement! And to find one in such good shape! I felt BAD
that I was going to have to, essentially, destroy it to achieve my goal.
I posted on the RPF forum to see if anybody had one that was in decent,
but worse shape, to keep the one I had (which still had its original
tags!) for display. But, alas, no such luck. I kept an eye on eBay for
another copy, but, again, didn't have any luck.
So, I proceeded... I
mixed my acrylics with liquid latex, rubbed the mask down with isopropyl alcohol and applied a base coat.
For reference, I relied on movie stills, but also a few busts I'd seen posted on Tom Spina's website. Artist Steven Richter sculpted both of the following busts and both are gorgeous. He worked from production-made prosthetics. Obviously, I didn't have access to THAT kind of shit (I wish), but I relied on the pictures and the YouTube video linked below tremendously.
https://www.tomspinadesigns.com/display/movie-prop-displays/two-face-makeup-tommy-lee-jones-bust/
https://youtu.be/AAgUpo0gZNs?si=kp7Q6cvc9WDCfmXc

^Goofing around with the mask before I painted it. As you can see, it's pretty big!
I used Humbrol Maskol to block off certain sections, like the veins, etc. It's essentially a liquid latex-type of masking fluid. You will also see that at a certain point, I stripped the hair off the mask. To my surprise, it had ridges and "hair swoops" sculpted ONTO the scalp to give the hair its shape. I needed to keep this in mind when it came time for me to figure out what to do with the hair.
It seemed to be going smoothly... But at one point, the latex paint bubbled and when I tried to smooth it out, it just began to peel like dead skin. That made me unhappy, so I peeled it all off...
...And started over:
I have never been super confident in my paint skills, so I asked my friend Kat, who is a much better painter than me, to do a wash and bring out some more of the details:
This is what it looked like after that. Pretty dang cool! Now, I just hoped it would actually work once I trimmed it up and stuck it to my own face...
THE WIG -
The wig literally came down to the last-minute. My original idea involved buying a genuine human hair wig and then gluing it TO the mask. But when I stripped the mask's original hair, as I mentioned above, I found those weird ridges. The original idea fell through completely when the "wig" I had bought turned out to be just tracks for extensions. Whoops. So, it was back to the drawing board. The weekend of the convention I was hoping to debut this cosplay at came and I ordered this wig on Amazon:
My aforementioned friend Kat helped me cut and style it (we pulled an all-nighter), curled it, sprayed the shit out of it with hairspray and hoped it would get us through. I think it did. This is not to take away from Kat's work at all--but I hope to eventually improve it!
THE FINAL RESULT...
We ran out of time to get it *completely* screen-accurate. The main differences being the Two-Face side's lapel is a notched lapel as opposed to a shawl lapel and that I also didn't quite have enough fabric to make a French-cuff for the left side wrist.
In the future, I also want to improve the collar of the shirt and give it that big 90s-style collar. All in all, though, I'm so damned happy with how it all came together!
My next post will showcase pictures of my complete cosplay in action! Stay tuned!


.jpg)


.jpg)


%20RPF%20Costume%20and%20Prop%20Maker%20Community.png)


.jpg)


.jpg)

Comments
Post a Comment